给Appium内置系统对话框自动处理 - appium-uiautomator2-driver篇

欢迎关注我的Appium知乎专栏:自定义Appium之路

当appium脚本的uiautomationName设置为UiAutomator2时,就会启动appium-uiautomator2-driver这个driver来执行你的脚本测试,而它的系统对话框的处理跟UIAutomator1的就不一样了,更加复杂一点。

因为UIAutomator2是一个apk形式的,本身可以认为是一个应用,是需要安装的,所以在启动UIAutomator2之前,就会碰到系统对话框的问题,此时,我们需要借助UIAutomator1来做这件事。

大体流程是:

  1. 启动UIAutomator1
  2. 用UIAutomator1来处理权限框
  3. 安装各种apk,包括UIAutomator2的apk
  4. 杀死UIAutomator1服务
  5. 启动UIAutomator2
  6. 使用UIAutomator2来监控界面,处理系统对话框

怎么做呢?

首先我们需要修改appium-uiautomator2-driver,因为原本的执行流程根本没有UIAutomator1的事情,我们需要把UIAutomator1引用进来:(appium-uiautomator2-driver/lib/driver.js)

import { androidHelpers, androidCommands, SETTINGS_HELPER_PKG_ID, UiAutomator } from 'appium-android-driver-cmext';

上面代码中的UiAutomator是我新加的,但是在appium-android-driver中并没有导出UiAutomator的,我们需要给它导出来:(在appium-uiautomator2-driver/index.js)

import * as driver from './lib/driver';
import * as androidHelperIndex from './lib/android-helpers';
import * as commandIndex from './lib/commands/index';
import * as webview from './lib/webview-helpers';
import * as caps from './lib/desired-caps';
import * as uia from './lib/uiautomator'; // 这是新增


const { AndroidDriver } = driver;
const { UiAutomator } = uia; // 这是新增
const { helpers: webviewHelpers, NATIVE_WIN, WEBVIEW_WIN, WEBVIEW_BASE,
CHROMIUM_WIN } = webview;
const { commonCapConstraints } = caps;
const { commands: androidCommands } = commandIndex;
const { helpers: androidHelpers, SETTINGS_HELPER_PKG_ID } = androidHelperIndex;


export default AndroidDriver;
export {
androidHelpers, androidCommands, AndroidDriver, startServer,
commonCapConstraints, webviewHelpers, NATIVE_WIN, WEBVIEW_WIN,
WEBVIEW_BASE, CHROMIUM_WIN, SETTINGS_HELPER_PKG_ID, UiAutomator // 这是新增
};

添加一个启动UIAutomator1服务的方法:(appium-uiautomator2-driver/lib/driver.js)

async startUiAutomator1Service () {
const rootDir = path.resolve(__dirname, '..', '..', '..', 'appium-android-driver');
const startDetector = (s) => { return /Appium Socket Server Ready/.test(s); };
const bootstrapJar = path.resolve(rootDir, 'bootstrap', 'bin', 'AppiumBootstrap.jar');
this.uiAutomator = new UiAutomator(this.adb);
await this.uiAutomator.start(
bootstrapJar, 'io.appium.android.bootstrap.Bootstrap',
startDetector);
}

因为这个driver.js没有导入path,我们还要导入path:

import path from 'path';

然后我们找到startUiAutomator2Session方法,分别添加如下代码:
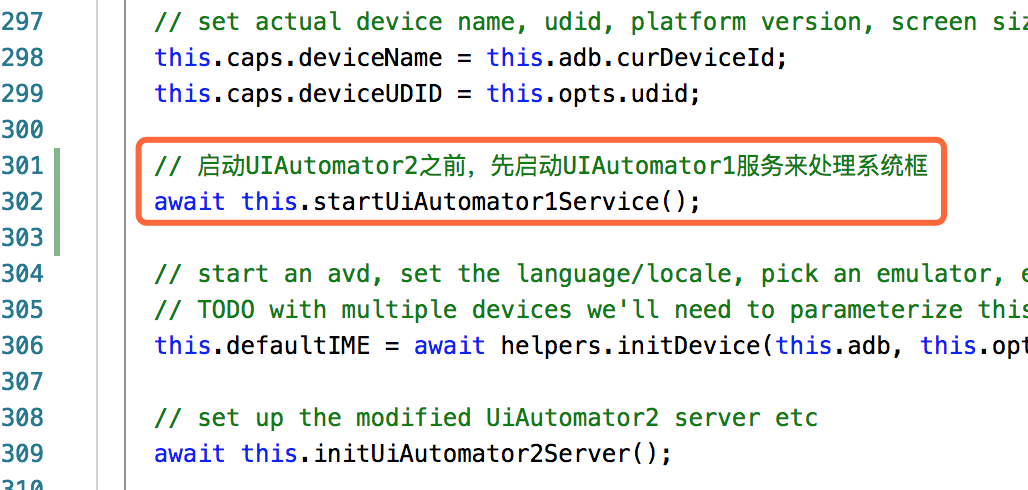
  1. 启动UIAutomator1的代码:

    // 启动UIAutomator2之前,先启动UIAutomator1服务来处理系统框
    await this.startUiAutomator1Service();
  2. kill UIAutomator1的代码:

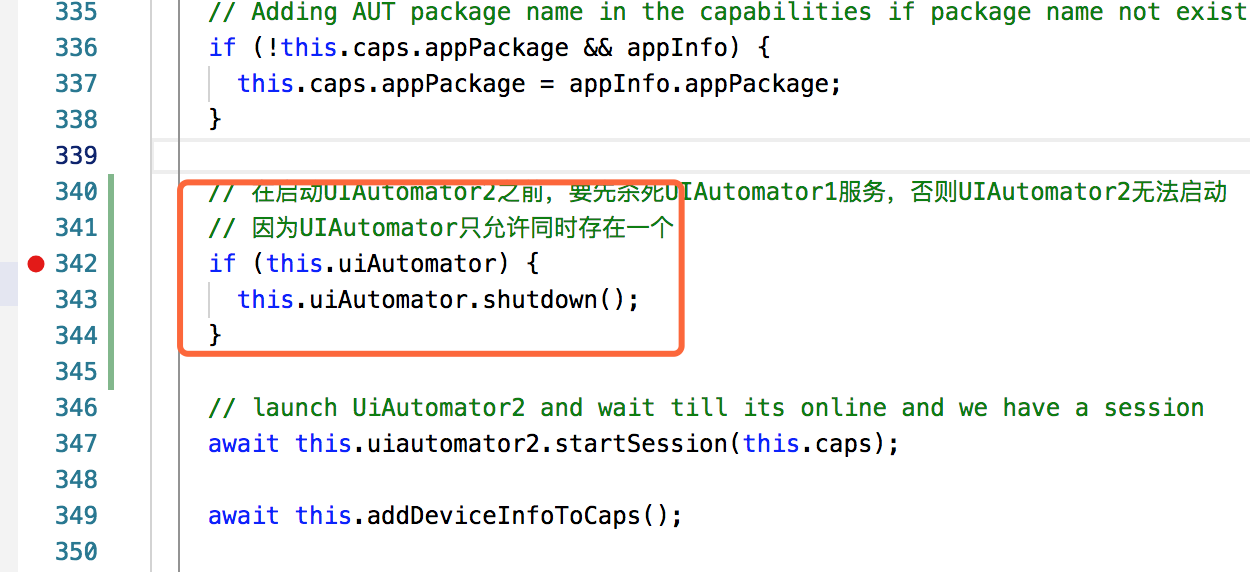
    // 在启动UIAutomator2之前,要先杀死UIAutomator1服务,否则UIAutomator2无法启动
    // 因为UIAutomator只允许同时存在一个
    if (this.uiAutomator) {
    this.uiAutomator.shutdown();
    }

位置如下图:

image-20190411171620414

image-20190411171642533

自此,nodejs的事情就完成了,剩下的就是要改造appium-uiautomator2-server的代码,让它能够像UIAutomator1一样监听界面,自动处理。

演示

过程:

  1. 本地启动appium
  2. 执行appium脚本测试
  3. logcat展示监控过程

appium-auto

cmlanche wechat
欢迎您扫一扫上面的微信公众号,订阅独立开发者